 I wish I was one of those women that had a stunning pregnancy- barely looked pregnant except for a perfect, round belly…. no swelling, no 1/2 shoe size bigger feet, and no stretch marks.
But I’m not.
I was bloated, swollen, my feet grew out of all my 8.5 size shoes- all those shoes, those beautiful, too-small shoes…. and with this second pregnancy, I got MAJOR STRETCH MARKS!!! And not, like, just one here and one there…. no, its like Wolverine attacked my belly, my sides, and my thighs.
So, I decided I needed to find some sort of solution for these battle scars to make them less noticeable so that one day, when my skin shrinks back and I’ve lost the baby weight, I have the confidence to wear a bikini again without fear of my stretch marks dissuading me from showing off all my hard work at the gym! I’m a doTERRA lover- totally believe in the magic (or voodoo as my husband calls it) of essential oils (EO). Also, they smell pretty! Well, most do. I tried making a roller bottle of a nice blend to start, but it became clear VERY quickly that that was not going to cover enough square footage fast enough to be an easy bedtime routine. What I really wanted was a luxurious-feeling body butter in a pretty jar by my bedside.
Enter, Pinterest.
After looking at several recipes and watching some youtube videos, I decided to jump in and concoct my own potion based on what I already have and what would be easy to get without special ordering. Mostly, because I’m impatient.
Alright, so here it is… my first foray into bath products, and my guinea pig concoction!
Body Beautiful Butter
Post Baby Belly Cream
Ingredients:
1 C Unscented Shea Butter (Same Here)
1/2 C Organic Coconut Oil
1/2 C Olive Oil
7.5 tsp Arrowroot Powder (can be found in bulk at Wholefoods)
10 Drops Patchouli EO
10 Drops Clary Sage EO
10 Drops Geranium EO
10 Drops Helichrysum EO
20 Drops Frankincense EO
30 Drops Lavender EO
Supplies:
Mixer (handheld/immersion/stand)
Glass jars
Spatula
Labels
Directions:
1. Melt shea butter, coconut oil, and olive oil in a double boiler to combine. You can use jojoba or almond oil instead of olive- it’s just what I had on hand.
2. Once all have melted, remove from heat. We’re not trying to boil or cook these, just get them melted so they blend evenly.
3. Add Arrowroot, mix in with a fork. **A Note Regarding Arrowroot**
Initially, I tried making this recipe without arrowroot because I didn’t know where to get it and was too impatient to wait to start until getting some, but after making the whole thing, it was FAR too oily/greasy to leave as is. I researched and most people recommended arrowroot (you could use cornstarch powder or tapioca powder alternatively). One person recommended 1 tsp to every 4 oz. My recipe made, roughly, 20 oz whipped, so I added 5 tsp, then used the rest when it still seemed greasy, which was about 7.5 tsp total in the end. You can add more or less but I might even use more in my next batch- at which point, I’ll report back here with a note.
4. Add Essential Oils.
**I added so much lavender to hopefully cover the more pungent scents of the less pretty smelling oils. **You can add more or less of each oil depending on your preference/need. I chose those that were most praised for skin health and repair as my aim is to shirk my belly skin and fade/erase stretch marks.
5. Place in refrigerator until it becomes cloudy in color and a film begins to form around bowl edges.
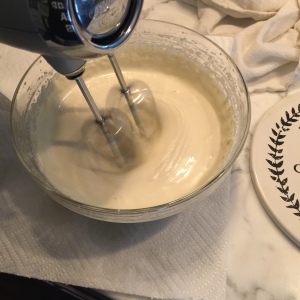
6. Whip with hand mixer or stand mixer for 10 minutes (it’ll start looking like vanilla pudding).
7. Place in refrigerator again to firm up some more (another 5-10 min).
8. Whip again for 5-10 minutes or until stiff peaks form. It should look like cool whip.
9. Place in air tight glass jars, slap on a pretty label, pass the extras out to other mama friends, and enjoy!
And now, for some photos of my process:
Here is what it looked like after melting all the butter & oils together (basically like olive oil): Mixing it up after it started to appear cloudy:
Mixing it an additional 10 min after setting in the fridge once more:
I ended up leaving it out on the counter last night to let it set some more and then finished mixing in the morning… here’s how it looked before placing it in the jars:

And there you have it: Body Beautiful Butter for Post Baby Bellies!


Making your own body butter is so smart! You know what’s in your product and you can customize it to suit you! I bet this smells amazing! Thank you kindly for sharing! Best wishes, Koko:)
LikeLike
Thanks!!! I’m excited to see how I like it over time 🙂
LikeLike