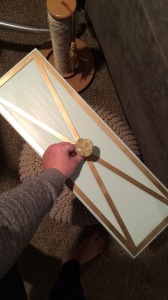
I have never owned a nightstand I truly loved. Or even liked, for that matter! So when I got married this was something I wanted- because it was finally my call! (I had a whole paragraph of a saga about my nightstand woes here, but it was boorish, so let’s cut to the chase) Now that we own our first home, I still can’t afford anything that I really like and is the right size, so, inspired by my friend Jenna who DIY’d the crap out of some Malm dressers from Ikea, I set to work… Found a few ideas I liked, bought the Ikea “Rast” dressers and some overlays from this shop– I went with the Xandra style- and then they sat in my house untouched for several months. This is typical of me- if I don’t do a project right when I’m excited about it, it sits around unfinished for weeks, months, sometimes until my husband throws it out. Anyway, with this newfound fervor for DIYing, I finally have the drive I need to get this project under way! So, as I mentioned in a previous post, I did get as far a spray painting the overlays gold. But I bought a cheap random gold at Ace, sprayed them on the grass- which meant the sides were hard to get and then a bunch of blades of grass were stuck to them when they were dry, and the shade of gold was just… the most blah gold you could imagine. See that sadness here: 
No sheen, no pop…. blah. So I’m hoping to bring them to life with a coat or two of Montana Gold! And now for the nightstands… so they start out like this:
Ideally I would have liked to go with a larger, slightly better quality dresser like the Malm that has smooth rolling drawers as opposed to the Rast that has cut outs in the sides of the drawers and a funny plastic bar that they slide on in the inside of the frame, but our bedroom is pretty small and we couldn’t go with anything bigger- bummer, I know. Here they are with the first coat of Palladian Blue by Benjamin Moore in an eggshell finish …

Alright, so the drawers come pre-drilled with two holes for knobs. I feel like it won’t look amazing with two knobs but I can’t just leave the holes. Hence, my first step into the land of wood filler and sandpaper. It may have been more prudent to fill the holes before painting, but I was anxious to start painting. And, as per usual, my impatience won out. I’m sure it’ll be fine. I happened to have some wood filler and a putty knife on hand from the house renovations- all I needed was sandpaper…

I really wasn’t sure what I was doing so I just went for it and quickly found the more filler, the better! Left is the filler already scraped into the hole and right is the little pile of filler just blobbed on. At this point I realized I’d probably need to let them all dry, sand them, and then add a bit more wood filler so there’s no trace of the old knob holes.

Here you can see that after the first application of wood filler had dried and been sanded, it still wasn’t flush with the drawer front, so I added more and let those dry.
I also decided that although I liked the look after just one coat of paint with the woodgrain showing through, I just couldn’t live with the texture of the wood- it felt too rough to touch and was not going to be easy to wipe clean when needed. Anything fabric would probably catch on it… I’m one of those people that can’t stand the feeling of chalkboards or anything similar (like the plates at Melting Pot- cringe!) and these felt chalkboardy to me! It could have been that the wood sucked up so much of the paint that it had that effect just on the first coat, or just that eggshell was too matte of a finish to use on raw wood. Whatever the case, I just had to try and remedy the feel. Off I went to Ace to buy a quart of the same paint but in a satin finish- which they only had in the aura collection that’s pricier, so I went with semi-gloss to save a few bucks and hoped I didn’t regret the decision! Here we are with the second coat- this time in a semi-gloss finish- applied and dried…
And here is how I got all the edges painted on the overlays:
I brought one inside with the overlays to see how it looked. I was thinking I miiiiight want to dry brush some light gray on to make them look a bit distressed/antiqued…. So I wanted to see them as they were before making a decision.
I decided to leave them for now, I could always add the gray paint down the road should I decide they need it.
And now, time to adhere the overlays onto the drawers. I originally bought wood glue, but after watching the how-to on the myoverlays blog, I went with their suggestion of the Liquid Nails Clear Silicone as it can supposedly make them removable if I ever wanted to put new ones on or repaint the dressers.
See all that grass stuck to the back of the overlay?? Haha, I am so lame for thinking spraying them on the grass was a good idea… but I digress.
I eyeballed it when putting them on…. I think they turned out even.
So once they had dried it was time to drill the holes for knobs. I bought two different knobs at Anthropologie to try- one bigger, fancier, girlier- and as such- more expensive, and one smaller, simpler, “fade into the drawer” knob. Deciding which I liked better was not easy at all. Off the drawers I liked the bigger ones the best- perfect match color wise, and just too fun to pass up.
I just couldn’t decide without seeing them in the drawers, the drawers all in the stand…. But I have no drill, and frankly was worried I’d screw the drawers up if I had tried drilling the holes myself anyway. So away for the night they went until I could convince someone to come over with a drill and help me.
Hoorah! My mom came over and decided I needed to lower my sons crib (which I did, but hadn’t gotten around to) and so she called my dad to come over and help her. He brought the drill and drilled the holes for my knobs! And thus, the night stands were finally finished!!….. as soon as I could decide which knobs to use:
Boring.
…nice, but maybe a little much?
…closer…
And the winner is……………………
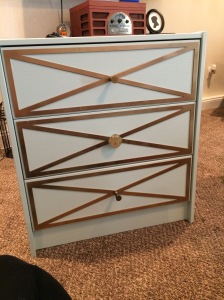
PERFECT!!!!! Now all I have to do is get all new bedding to complement them and some new fabric to drape over my headboard so it isn’t clashing like crazy until we can buy a new one!
UPDATE…. here it is in our room with our new bedding and headboard 🙂


I’m reading your lovely little project with glee as I feel like you’re myself but a few steps ahead! As a new adult I’m so excited saving up for what could be my future home and the crazy amount of projects I could do to jazz it up at a budget price. Oh and the marble you’ve used on your kitchen benchtops are divine!
No doubt I’ll be visiting tonnes of blog posts like yours when my time comes around. 🙂
The Little World of Linda | http://www.applemeeko.wordpress.com
LikeLike
So glad you like it!! They were a lot of fun to do!
LikeLiked by 1 person
Absolutely 🙂 can’t wait to see your new ideas in the future as well!
LikeLike
Beautiful job! You do nice work.
LikeLike
Thank you!! I love your products!
LikeLike